
Answer
Jan 13, 2025 - 07:06 AM
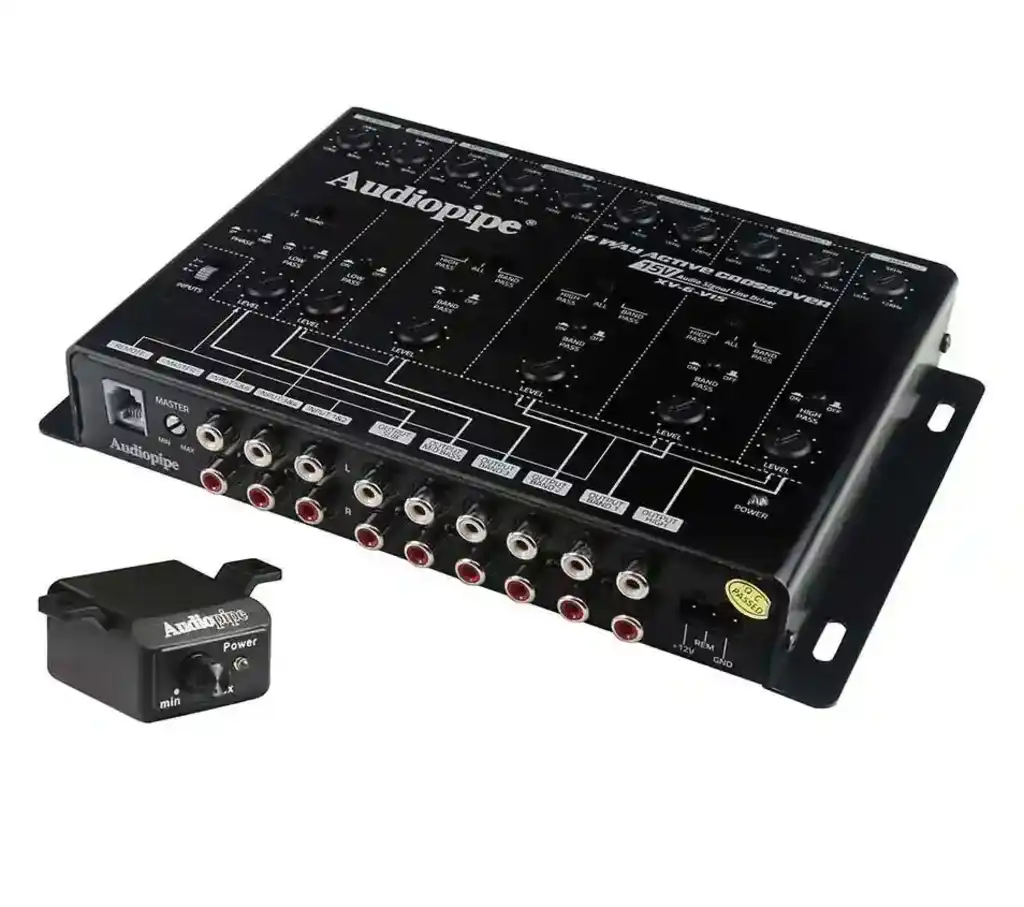
To connect and set up this unit, follow these general steps:
-
Mounting the Crossover:
- Install the XV-6V15 in a stable location near your amplifiers, ensuring it's not directly mounted to metal surfaces to prevent potential interference.
-
Power Connections:
- Ground (GND): Connect this terminal to a solid chassis ground point in your vehicle.
- Remote Turn-On (REM): Link this to the remote turn-on lead from your head unit to allow the crossover to power on with your audio system.
- Battery Positive (+12V): Connect to a constant +12V power source, typically the positive terminal of your vehicle's battery, using an appropriate fuse for protection.
-
Input Connections:
- The XV-6V15 accepts up to 6 channels of input.
- 2/4/6 Channel Input Selector: Set this switch based on the number of input channels from your head unit:
- 2CH: For a single stereo input.
- 4CH: For front and rear stereo inputs.
- 6CH: For front, rear, and subwoofer inputs.
-
Output Connections:
- The crossover provides 12 output channels, categorized as:
- High/Tweeter Outputs: For high-frequency drivers.
- Bandpass Outputs: For midrange drivers.
- Midbass Outputs: For mid-bass drivers.
- Subwoofer Outputs: For subwoofers.
- Connect each output to the corresponding amplifier input designated for that frequency range.
- The crossover provides 12 output channels, categorized as:
-
Adjusting Crossover Settings:
- Utilize the front panel controls to fine-tune crossover frequencies, gains, and other parameters:
- Crossover Frequency Knobs: Adjust the cutoff frequencies for each channel pair.
- Gain Controls: Set the output level for each channel pair to match amplifier sensitivities.
- HP/ALL/BP Switches: Select the desired crossover mode for each channel pair.
- Phase Switch: Choose between 0° or 180° phase shift for subwoofer alignment.
- Subsonic Filter: Engage and adjust to remove inaudible low frequencies that can strain subwoofers.
- Utilize the front panel controls to fine-tune crossover frequencies, gains, and other parameters:
-
Remote Subwoofer Level Control:
- Connect the provided remote control to the designated port on the crossover to allow real-time adjustment of the subwoofer level from the driver's seat.
-
Final Checks:
- Ensure all connections are secure and correctly matched.
- Power on your audio system and verify that each speaker receives the appropriate frequency range.
- Make incremental adjustments to the crossover settings to achieve the desired audio performance.
For detailed specifications and additional guidance, refer to the XV-6V15 product manual available on Audiopipe's official website.
AudiopipeIf you require further assistance, consider reaching out to Audiopipe's technical support team at tech@audiopipe.com.
AudiopipeProper installation and configuration of the XV-6V15 will significantly enhance your audio system's clarity and performance by ensuring precise frequency distribution across your speakers.


Add New Comment