
Answer
Oct 29, 2024 - 02:11 PM
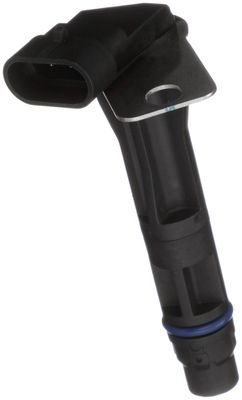
Replacing the camshaft position sensor on an LS1 engine is straightforward but requires precision. Here’s a step-by-step guide to help you through it:
Tools & Materials- New camshaft position sensor
- Ratchet and socket set
- Torque wrench
- Screwdriver
- Engine oil (to lubricate the new sensor's O-ring)
-
Safety First
- Disconnect the negative battery terminal to avoid any electrical mishaps.
-
Locate the Camshaft Position Sensor
- On LS1 engines, the camshaft position sensor is typically located at the back of the engine near the firewall, just above the transmission bellhousing.
-
Access the Sensor
- You may need to remove the intake manifold for easier access, though on some setups, it may be accessible without this step.
-
Disconnect the Wiring Harness
- Locate the wiring connector for the camshaft position sensor. Carefully depress the connector tab and pull it away from the sensor.
-
Remove the Sensor
- Using a socket, remove the bolt securing the sensor in place. Carefully pull the sensor straight out. Be gentle to avoid breaking the sensor or its mounting area.
-
Install the New Sensor
- Lightly lubricate the O-ring on the new sensor with a bit of engine oil for an easier fit. Insert the new sensor, aligning it properly with the mounting hole, and secure it with the bolt. Torque to the manufacturer’s specification (typically 8-10 ft-lbs).
-
Reconnect the Wiring Harness
- Attach the wiring connector back onto the sensor until it clicks into place.
-
Reassemble and Test
- If you removed the intake manifold or any other components, reassemble them. Reconnect the battery and start the engine to ensure proper operation.
- Check the service manual for any specific torque values and steps for your LS1 model.
- Verify the wiring connection is secure to avoid any sensor issues once installed.
This should get your LS1 running with a properly functioning camshaft position sensor!


Add New Comment