
Answer
Aug 21, 2024 - 07:50 AM
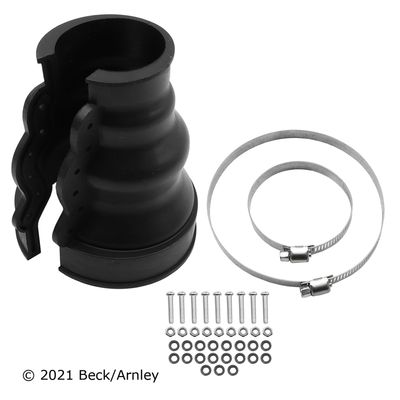
Inspecting your CV boot, especially when using a GM Genuine Parts 19256071 CV Boot Kit, involves a few steps to ensure that the boot and the CV joint it protects are in good condition. Here’s a step-by-step guide on how to inspect your CV boot:
1. Preparation- Safety First: Park your vehicle on a flat surface, engage the parking brake, and ensure the engine is off.
- Lift the Vehicle: Use a jack to lift the vehicle and secure it with jack stands. Make sure the vehicle is stable before you proceed.
- Remove the Wheel: Remove the wheel to access the CV boot. This will give you a clear view of the CV axle and boot.
- Check for Cracks or Tears: Examine the CV boot for any visible cracks, tears, or holes. Even small cracks can allow dirt and moisture to enter, which can lead to CV joint damage.
- Look for Grease Leaks: Inspect the area around the boot for any signs of grease splatter. A leaking boot will often fling grease around the wheel well and suspension components. If you see grease, the boot is likely damaged and needs replacement.
- Examine the Boot Condition: Check the overall condition of the boot. If it appears dry, brittle, or is showing signs of aging (such as hardening or cracking), it’s a sign that the boot may fail soon.
- Feel for Flexibility: Gently squeeze and flex the CV boot with your hands. It should be flexible and pliable. If it feels stiff or brittle, it's likely that the rubber has deteriorated, and the boot may need replacement.
- Check for Clamps and Seals: Inspect the metal clamps that secure the boot to the axle. Ensure they are tight and not loose or missing. Loose clamps can cause the boot to slip or leak grease.
- Turn the Steering Wheel: With the wheel off and the vehicle lifted, turn the steering wheel fully to the left and then to the right. This movement will stretch the CV boot, making any potential damage more visible.
- Rotate the Axle: Manually rotate the axle shaft to inspect the entire circumference of the boot. Look for any abnormalities or signs of wear that may not have been visible in the initial inspection.
- Listen for Noise: While rotating the axle, listen for any clicking, popping, or grinding noises. These sounds may indicate that the CV joint itself is already damaged due to a compromised boot.
- Check for Play: Gently move the CV joint back and forth to check for excessive play. Some movement is normal, but too much play can indicate that the joint is worn and may need to be replaced along with the boot.
- Prepare the Replacement: If you find that the boot is damaged or worn, use the GM Genuine Parts 19256071 Kit to replace it. The kit should include the new boot, grease, and clamps.
- Clean the Area: Before installing the new boot, clean the CV joint and surrounding area to remove any old grease, dirt, or debris.
- Apply Grease: Use the grease included in the kit to thoroughly lubricate the CV joint. Proper lubrication is essential to the joint’s function and longevity.
- Install the New Boot: Carefully slide the new boot into place over the CV joint and secure it with the new clamps provided in the kit.
- Check the Installation: Ensure that the boot is seated correctly and that the clamps are tight. Double-check for any gaps or misalignments.
- Reattach the Wheel: Once the new boot is in place, reattach the wheel and lower the vehicle.
- Test Drive: Take the vehicle for a test drive and listen for any unusual noises. Ensure that the steering and handling feel normal and that there are no vibrations.
Inspecting your CV boot with the GM Genuine Parts 19256071 Kit is straightforward. Regular inspection can help you catch issues early, preventing costly repairs by protecting the CV joint from damage. If you find any damage or wear during your inspection, replacing the boot using the kit is a crucial step in maintaining your vehicle’s drivetrain health.


Add New Comment