
Answer
Aug 14, 2024 - 01:14 PM
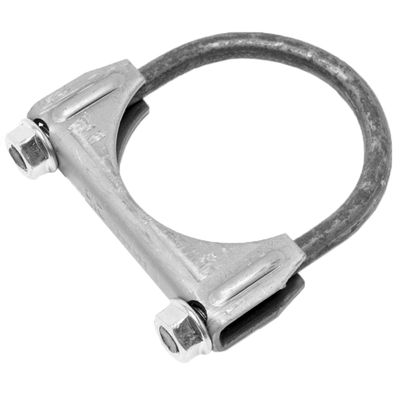
Correctly positioning Walker Exhaust 35337 Exhaust Clamps is essential for ensuring a secure, leak-free connection in your exhaust system. Here's a step-by-step guide on how to position and install these clamps properly:
Tools and Materials Needed:- Walker Exhaust 35337 Exhaust Clamp
- Wrench or socket set (typically a ratchet with the appropriate socket size)
- Protective gloves
- Penetrating oil (if necessary)
- Tape measure (optional for precise alignment)
1. Prepare the Exhaust Components:
- Inspect and Clean the Pipes: Ensure that the exhaust pipes or components being joined are clean and free of rust, dirt, or debris. Cleaning the surfaces where the clamp will be installed helps to ensure a good seal.
- Align the Pipes: Make sure the exhaust pipes or components that you are connecting are properly aligned. The ends of the pipes should fit together smoothly without gaps. If necessary, use a tape measure to check that the overlap is even.
2. Position the Exhaust Clamp:
- Place the Clamp Over the Joint: Slide the Walker 35337 Exhaust Clamp over the area where the two exhaust components meet. Ensure the clamp is centered over the joint so that it can apply even pressure across the entire connection.
- Correct Orientation:
- The U-bolt of the clamp should wrap around the outside of the exhaust pipes.
- The saddle (the curved metal piece) should sit on the top of the joint, covering the connection point where the pipes meet.
- Make sure the clamp is positioned so that it can be tightened evenly. The saddle should fully cover the joint without tilting or slipping off to one side.
3. Tighten the Clamp:
- Start Tightening Evenly: Begin tightening the nuts on the U-bolt using a wrench or socket set. Tighten each nut a little at a time, alternating between the two nuts. This ensures that the clamp tightens evenly on both sides and avoids skewing.
- Apply Sufficient Torque: Continue tightening until the clamp is snug and secure. The nuts should be tightened until the pipes are securely clamped and there’s no movement. Check the manufacturer’s recommendations or your vehicle’s manual for specific torque settings, if available.
- Avoid Over-tightening: Be careful not to over-tighten the clamp, as this can crush or deform the exhaust pipes, leading to restricted exhaust flow or potential leaks.
4. Check for Leaks:
- Visual Inspection: After tightening the clamp, visually inspect the joint to ensure there are no gaps or visible leaks.
- Run the Engine: Start the vehicle and let it idle. Listen for any hissing sounds or observe for any exhaust gases escaping from the joint. If you notice any leaks, you may need to tighten the clamp a bit more.
- Recheck After Driving: After driving the vehicle for a short distance, recheck the clamp to ensure it remains tight and there are no leaks. Exhaust systems can expand and contract with heat, so it’s a good idea to verify the clamp’s tightness after the system has been heated and cooled.
5. Final Adjustment:
- If you notice any exhaust leaks or if the clamp seems loose after the initial installation, slightly adjust the position and re-tighten the nuts as necessary. Make sure the clamp is still centered over the joint and providing even pressure.
- Use Penetrating Oil (if necessary): If the nuts on the clamp are difficult to tighten due to rust or corrosion, apply a small amount of penetrating oil to help them turn more easily.
- Ensure the Correct Clamp Size: Before installation, double-check that the Walker 35337 clamp is the correct size for your exhaust pipes. A clamp that is too large or too small will not create a proper seal.
Correctly positioning and tightening the Walker Exhaust 35337 Exhaust Clamp involves aligning the exhaust pipes, centering the clamp over the joint, and tightening the nuts evenly to ensure a secure, leak-free connection. Proper installation is key to maintaining the integrity of your exhaust system and preventing leaks or damage.


Add New Comment